
 Eng
Eng  中文简体
中文简体Submit feedback
X-Ring Motorcycle Chains: How They Work and How to Choose
Update:31-07-2026
Posted by Admin
Content
What Makes X-Ring Motorcycle Chains Different
An X-ring motorcycle chain is a sealed drive chain that uses X-shaped (also called quad-ring) sealing rings between the inner and outer link plates to retain grease at the pin-and-bushing interface while keeping dirt and moisture out. The X cross-section creates two contact points against the link plate rather than the single flat contact of an O-ring seal, which reduces friction and allows the ring to flex more naturally as the chain articulates around the sprockets. This design lowers rolling resistance compared to O-ring chains while still maintaining an effective grease seal, giving riders a combination of smoother power delivery and long service life.
Because the seal keeps factory-packed grease locked inside the pin bushing area, X-ring chains resist the internal wear that ultimately causes chains to stretch and lose tension. This is the main reason sealed chains, including X-ring designs, have become the standard choice for most modern street and sport motorcycles rather than the older unsealed chains still found on some smaller displacement or off-road bikes.
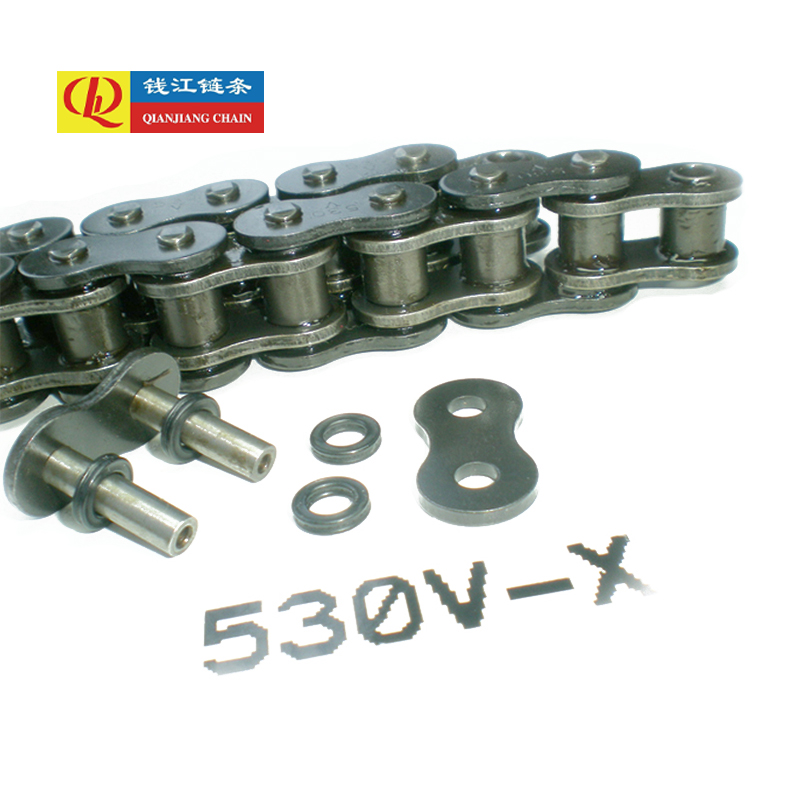
X-Ring vs O-Ring vs Unsealed Chains
Understanding how X-ring chains compare to other sealing technologies helps clarify why they are often recommended for higher-performance or higher-mileage applications.
Chain Type Comparison
| Chain Type | Friction Level | Typical Lifespan | Best Use Case |
| Unsealed chain | Low | Shortest, needs frequent lubrication | Small displacement or off-road bikes |
| O-ring chain | Moderate | Long | Commuting and general street riding |
| X-ring chain | Lower than O-ring | Longest among sealed designs | Sport, touring, and high-mileage riders |
Key Specifications When Choosing a Chain
Selecting the correct X-ring chain requires matching several specifications to the motorcycle's original equipment or intended use, since an incorrect size or strength rating can lead to premature failure or poor shifting performance.
- Pitch and width: expressed as a three-digit number such as 520, 525, or 530, indicating the distance between pins and the roller width.
- Link count: must match the bike's swingarm length and sprocket configuration, since chains cannot be lengthened, only shortened.
- Tensile strength rating: measured in pounds or kilonewtons, indicating the maximum load the chain can handle before breaking.
- Master link type: available as a clip-style link for easy field replacement or a rivet-style link that requires a chain press for a more secure, permanent joint.
Matching Chain Size to Your Motorcycle
Chain size is typically determined by the manufacturer based on the bike's power output and intended use, so the safest approach is to match the original equipment size and link count exactly unless upgrading for a specific performance reason. Smaller displacement motorcycles commonly use 420 or 428 pitch chains, mid-size street bikes often use 520 or 525 pitch, and larger touring or cruiser models frequently use 530 pitch chains for additional strength. Riders modifying gearing or upgrading from a stock chain to a stronger aftermarket option should confirm sprocket compatibility, since changing chain pitch also requires matching front and rear sprockets.
Installation Best Practices
Proper installation directly affects both chain longevity and rider safety, since a poorly fitted or incorrectly tensioned chain can jump off the sprockets or place uneven stress on the swingarm.
- Measure and cut the chain to the exact link count specified for the motorcycle model.
- Use a chain breaker and press tool for rivet-style master links to ensure proper pin flaring and plate seating.
- Set chain slack according to the manufacturer's specification, typically measured at the tightest point of chain rotation.
- Check sprocket alignment using the swingarm's index marks to prevent uneven wear from a misaligned rear wheel.
- Replace the chain along with the front and rear sprockets as a set if wear indicators show significant stretch or hooked sprocket teeth.
Maintenance Tips to Extend Chain Life
While X-ring chains require less frequent attention than unsealed chains, regular maintenance still significantly extends their service life. Cleaning the chain with a soft brush and a cleaner formulated for sealed chains helps remove road grime without damaging the X-ring seals, which can be degraded by harsh solvents such as gasoline or aggressive degreasers. After cleaning, applying a lubricant specifically labeled safe for O-ring or X-ring chains helps maintain the external roller and pin surfaces without breaking down the internal seal.
- Lubricate the chain after riding while it is still warm, allowing the lubricant to penetrate more effectively.
- Avoid high-pressure washing directly on the chain, which can force water past the seals and wash out internal grease.
- Check and adjust chain slack every 500 to 600 miles, or according to the manufacturer's recommended interval.
- Inspect for stiff links, which can indicate a damaged seal allowing grease to escape and dirt to enter the pin bushing.
Recognizing When Replacement Is Needed
Even a well-maintained X-ring chain eventually wears out, and recognizing the warning signs helps prevent sudden failure or damage to the sprockets. Visible signs of a worn chain include excessive slack that cannot be corrected within the adjuster's range, rusty or discolored links despite regular lubrication, and rollers that no longer spin freely on the pins. A simple field test involves pulling the chain away from the rear sprocket at its midpoint; if it lifts far enough to expose more than half a sprocket tooth, the chain has stretched beyond a safe wear limit and should be replaced along with matching sprockets to avoid accelerated wear on new chain links.
News
-
I. Introduction Conveyor systems form the backbone of modern industrial automation, enabling the eff...
READ MORE -
1. Introduction 1.1 Definition and Basic Concept of Coupling Chains Coupling chains are mechanical d...
READ MORE -
1. Introduction to Leaf Chains Leaf chains are a type of mechanical chain used in a variety of indus...
READ MORE

 +86-13805752016
 +86-571-82875104/82875108
 [email protected]
 No. 80 QianNong West Road, Xiaoshan District, Hangzhou City, Zhejiang Province,China
Copyright © Hangzhou Qianjiang Chain Industries Co., Ltd. All Rights Reserved.
|
 浙公网安备33010902004043号